Django Tutorial Part 4: Django admin site
現在,我們已經為本地圖書館網站 LocalLibrary 創建了模型,我們接下來使用 Django 管理網站,去添加 一些 「真實的」 書本數據。首先,我們展示如何用管理網站註冊模型,然後展示如何登錄和創建一些數據。本文最後,我們介紹可以進一步改進管理網站的建議。
| 前提: | 先完成: Django Tutorial Part 3: Using models. |
|---|---|
| 目標: |
了解 Django 管理站的優點與侷限,並使用它來為我們的模型新增一些資料。 |
概覽
Django 管理應用程序可以使用你的模型,自動構建可用於創建,查看,更新和刪除記錄的網站區域。這可以在開發過程中,節省大量的時間,從而很容易測試你的模型,並了解你是否擁有正確的數據。根據網站的類型,管理應用程序也可用於管理生產中的數據。 Django 項目建議僅用於內部數據管理(即僅供管理員或組織內部人員使用),因為以模型為中心的方法,不一定是所有用戶最好的界面,並且暴露了大量不必要的關於模型的細節。
創建基礎項目時,自動完成所有的配置文件,包含你的網站中的管理應用程序在內(有關所需實際依賴關係的信息,如有需要請看 Django docs here)。其結果是,要將模型添加到管理應用程序,你必須做的,僅僅是註冊他們。在本文末尾,我們將簡要介紹,如何進一步配置管理區域,以更好地顯示我們的模型數據。
註冊模型後,我們將展示,如何創建一個新的 「超級用戶」,登錄到該網站,並創建一些書籍,作者,書籍實例和書籍類別。這些將有助於測試我們將在下一個教程中,開始創建的視圖和模板。
註冊模型(Registering models )
首先,我們從 catalog app 中打開 admin.py (/locallibrary/catalog/admin.py),目前它長的像下面區塊,注意它已經幫你導入 django.contrib.admin:
from django.contrib import admin

# Register your models here.
將下方的程式碼複製貼在 admin.py 文件下方以註冊所有模型,這段程式碼簡單來說就是先將模型導入,再呼叫 admin.site.register 函式來註冊每個模型。
from .models import Author, Genre, Book, BookInstance

admin.site.register(Book)
admin.site.register(Author)
admin.site.register(Genre)
admin.site.register(BookInstance)
備註: 如果你在上一章節最後有接受挑戰並建立一個書本的「語言模型」 (查看模型教學文章),你必需也要導入並註冊該模型!
這是註冊模型最簡單的方式。
而管理站則是高度用戶化的,我們會在接下來繼續說明其它註冊你的模型的方式。
創建超級用戶(Creating a superuser)
為了能夠登入管理站,我們需要一個有啟用員工狀態(Staff status)的使用者帳號,另外為了要能檢視與產生資料,我們也需要讓這個使用者帳號擁有管理所有物件的權限,因此,你可以透過 manage.py 來創建一個擁有所有網站存取權限的超級用戶(superuser)。
在與 manage.py 同一個資料夾中執行下方指令,建立一個超級用戶,你會被提示要輸入「使用者名稱」、「使用者 e-mail」和「強度夠高的密碼」。
python3 manage.py createsuperuser
當完成指令輸入後,一個新的超級用戶就會被加進資料庫中,再來只要重新啟動開發用 server ,你便可以進行登入測試:
python3 manage.py runserver
登入並開始使用網站
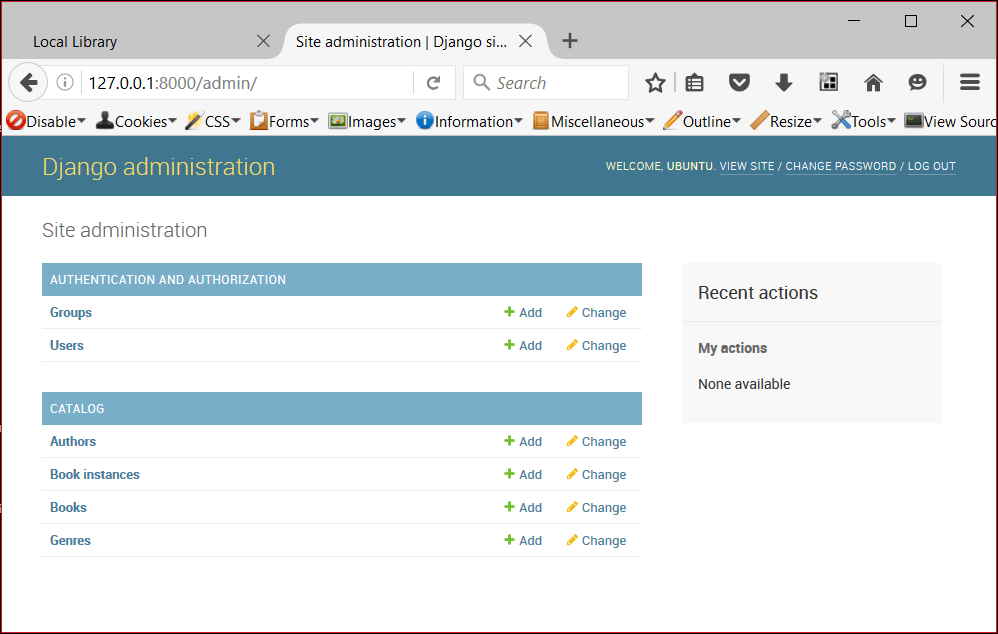
要登入網站,必須先連上 /admin URL (e.g. http://127.0.0.1:8000/admin) 並且輸入你的超級用戶的使用者名稱與密碼(你會被重新導向登入頁面,輸入你的帳密後會再回到 /admin URL)。
網站中的這部分羅列了所有以我們安裝的 app 分組的模型,你可以點擊模型名稱進入陳列所有與其相關連資料的頁面,而你可以進一步編輯它們,或者你也可以直接點擊模型名稱旁邊的 Add 連結來開始創建該類型的資料。
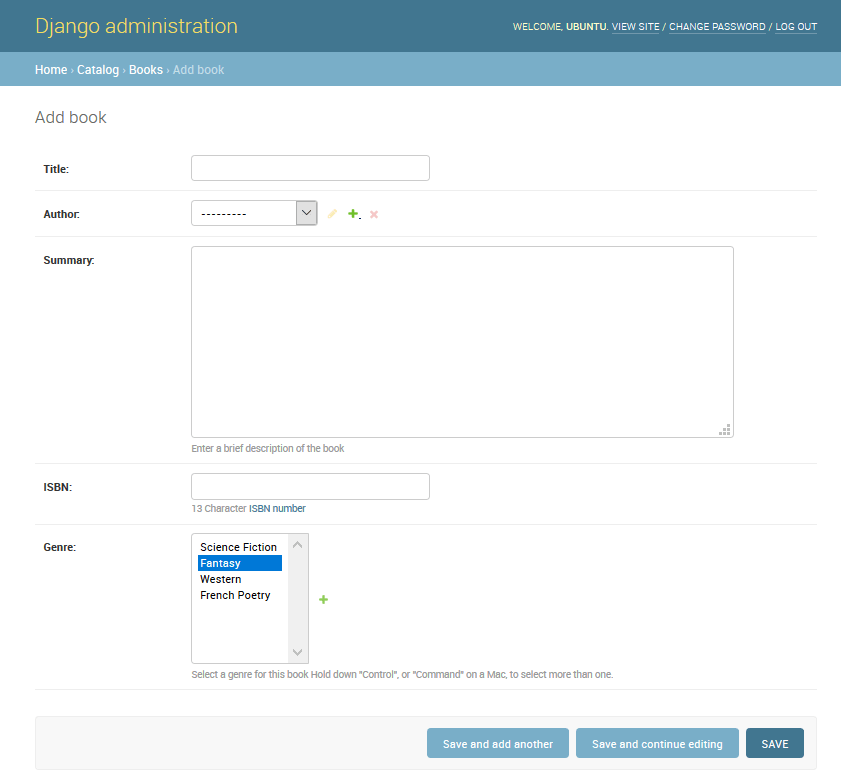
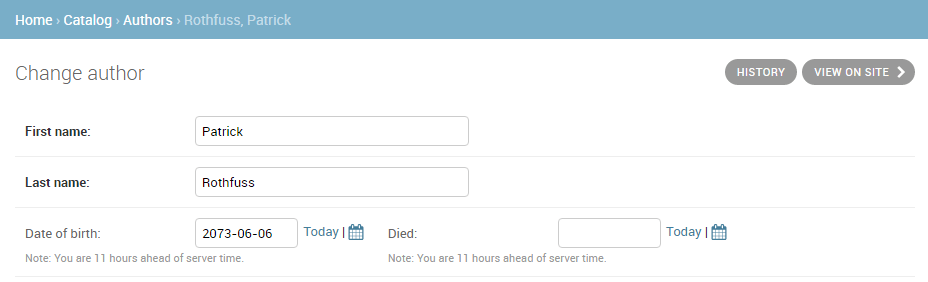
點擊 Books 右邊的 Add 連結來新增一本新書(會產生如下方的對話方塊),可以去觀察每個字段(field)、小部件、提示文字(如果有的話)是如何對應到你的模型的。
在字段中輸入值,你可以透過各個字段旁邊的 + 按鈕來新增「作者」或「書籍類別」(或者從列表中選擇你已經新增的值),當你完成後可以點選 SAVE, Save and add another, 或 Save and continue editing 來儲存該筆資料。
備註: 在這邊我們希望你花點時間在你的 app 中新增一些書本、作者和書及類型(例如:奇幻等)。請確保每位作者與每種書籍類型都分別關聯了一本以上的書(這在文章稍後的實作的時候,會讓你的列表與細節視圖更加豐富有趣)。
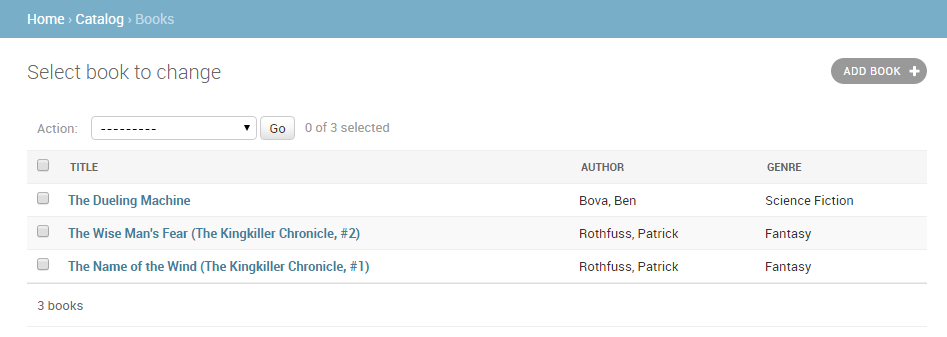
當你新增完書本後,點擊上方書籤的 Home 連結回到主要管理頁面,接著點擊 Books 連結來展示目前的書本清單(你也可以點及其他連結看看其他模型的列表),現在你已經加了幾本書,畫面應該會與下方截圖類似,你可以看到下方陳列了每本書的標題,這是我們在上一篇文章所提到的 Book 模型中的 __str__() 方法所回傳的值。
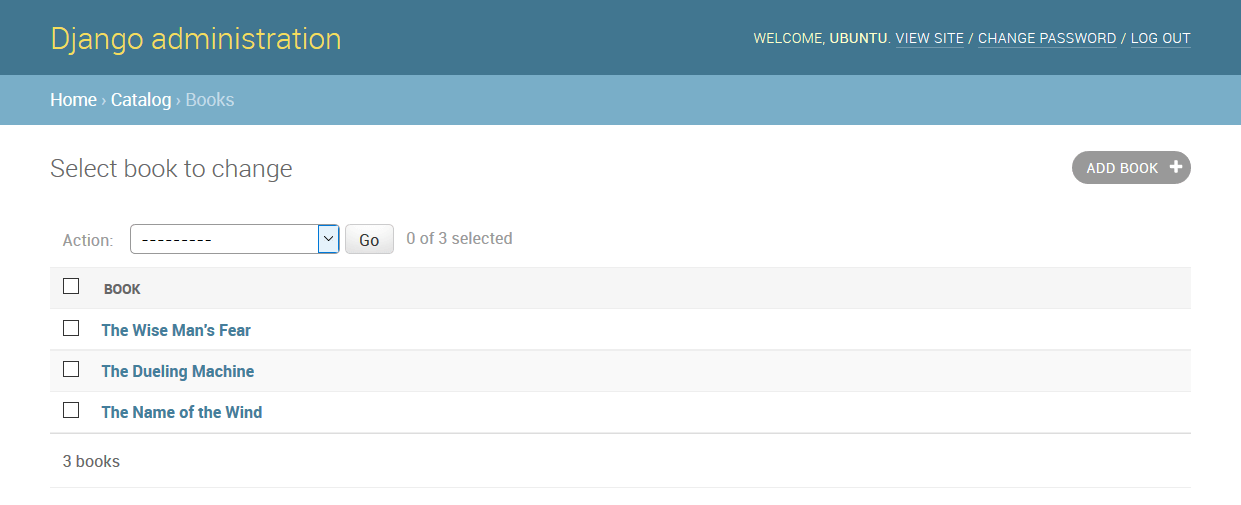
在列表中,如果要刪掉你不想要的書,只需要先勾選欲刪除書本的勾選方框,從動作下拉選單選擇刪除動作(delete action),接著點選 GO 按鈕即可,另外你也可以點選 ADD BOOK 按鈕來新增一本書。
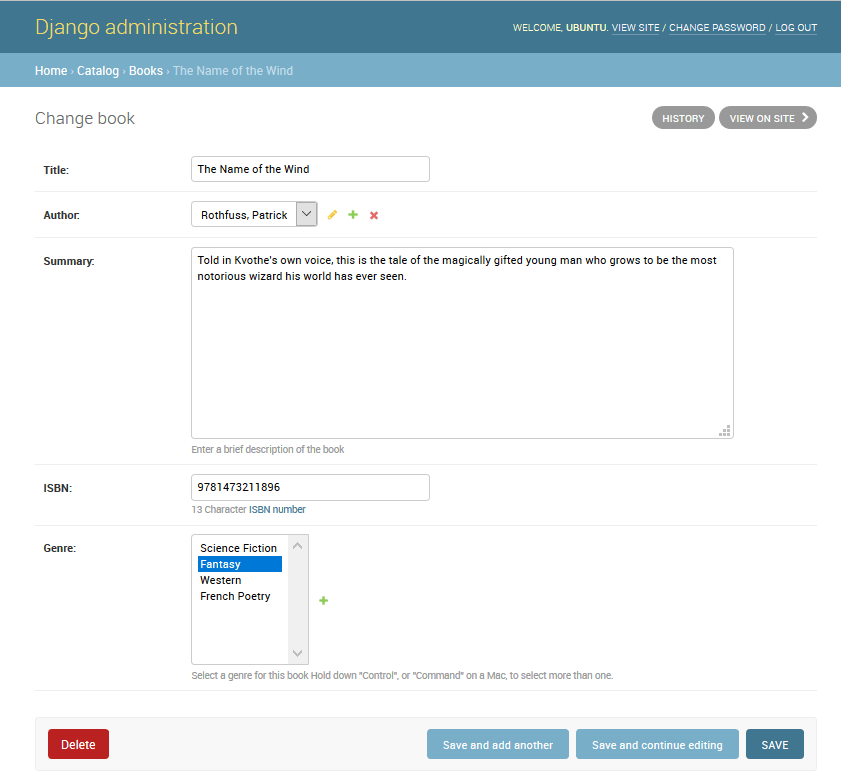
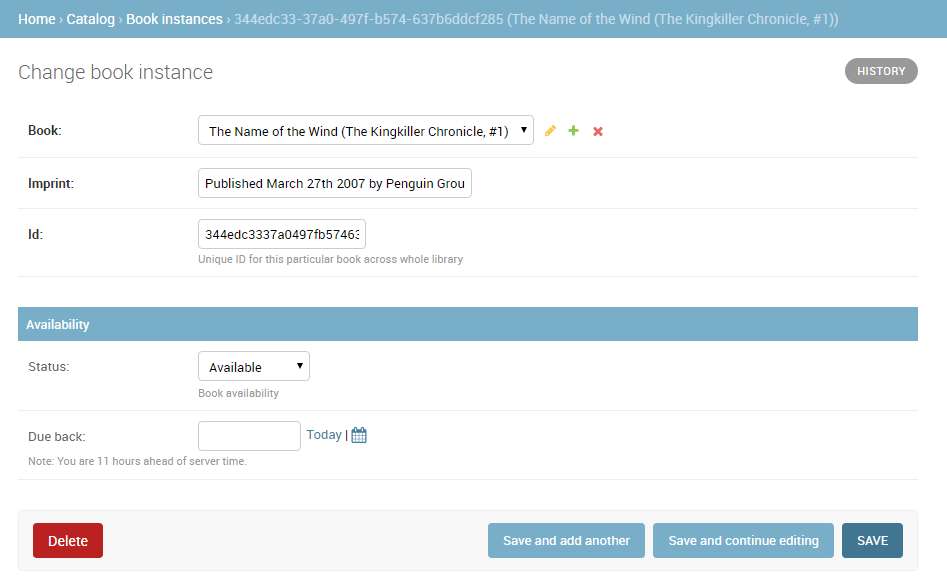
你可以點擊書名來編輯它,下方顯示的書本編輯頁面幾乎與 Add 頁面相同,主要差異在於頁面的標題(Change book)以及增加了 Delete, HISTORY 和 VIEW ON SITE 按鈕(會有這個按鈕出現是因為我們之前在模型中有定義了 get_absolute_url() 的方法)
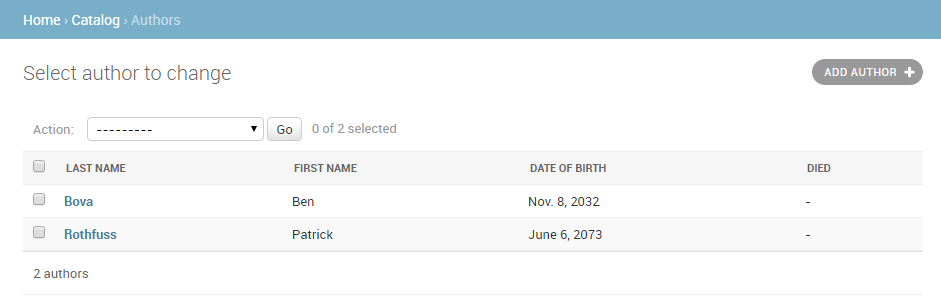
現在透過頁面上方的索引連結回到 Home 頁面,然後看看 Author 和 Genre 列表,你在新增書本的時候應該已經新增了一些資料,不過你還可以再新增更多。
你還沒有任何書本實例(Book Instances),因為這不會在建立書本時就產生(但你可以在新增 BookInstance 資料時新增 Book ,這是 ForeignKey 字段的性質)。現在回到 Home 頁面然後點擊 Book instances 的 Add 按鈕,畫面會呈現如下圖的頁面,注意第一列有個很長、全域唯一的 id 編碼,它可以用來區分每本書在圖書館裡的每個副本。
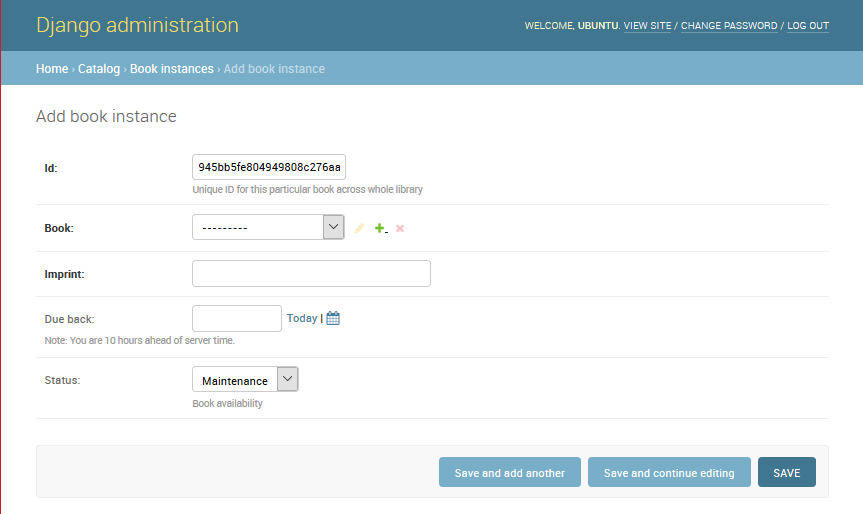
幫你的每本書都新增幾筆不同的資料,有些資料的狀態(Status)請設成 Available ,有些則設成 On loan,如果狀態為 not Available,那記得需要設定到期日(Due back date*)。*
就是這樣!你現在已經學會了如何建立與使用管理站(administration site),你也為你的 Book, BookInstance, Genre, 和 Author 模型建立了幾筆資料,再來當我們建立好視圖(Views)以及模板(Templates)後,就會開始來使用它們。
進階組態(Advanced configuration)
Django 在「透過註冊模型的資訊建立管理站」這方面做得非常好:
- 每個模型都有各自的資料列表,每筆資料都藉由模型的
__str__()方法來做分辨,而且會連結到更詳細的視圖/表格以便後續編輯,而且在預設情況下,這個視圖(View)的上方有一個「動作清單(action menu)」,你可以使用裡面的 delete 功能來執行資料的刪除作業。 - 用於編輯和新增紀錄的模型詳細紀錄表單包含了模型中的所有字段,並依照宣告順序垂直排列。
你可以進一步訂製介面讓它更好用,以下是你可以進一步做的:
- 列表視圖(List views):
- 為每一筆紀錄增加額外的字段/資訊陳列。
- 為這些紀錄列表增加篩選器(例如:使用日期、使用狀態進行過濾)
- 為動作選單(action menu)添加額外的動作,並選擇是否要讓此選單在表格中呈現。
- 細節視圖(Detail views):
- 選擇那些字段要隨著「順序、分組、可否編輯、是否被模組使用、取向」而陳列(或排除)。
- 添加相關的字段來允許內聯編輯(inline editing)(例如:添加一個功能讓你可以在新增一個作者的時候也順便能夠新增或編輯他的書本記錄)。
這部分我們將要來看幾個有助於改善 LocalLibrary 介面的小變化,包含了添加更多資訊到 Book 和 Author 模型列表,以及改善編輯視圖的排版。我們不會改變 Language 和 Genre 的模型外貌因為他們都各只有 1 個字段,這樣做沒好處!
你可以在 The Django Admin site (Django Docs) 找到關於管理站訂製選擇的完整參考。
註冊一個 模型管理 類別 (ModelAdmin class)
為了要改變模型在管理站的陳列方式,你需要定義一個模型管理(ModelAdmin)類別 (他是用來描述排版的),並且將它與其他模型一起註冊。
我們現在先從 Author 模型開始。打開 catalog app 中的 admin.py 檔案(/locallibrary/catalog/admin.py),並將先前註冊 Author 模型的程式碼註解(在程式碼前面加一個 # 前綴):
# admin.site.register(Author)
現在加上一個新的 AuthorAdmin 類別與註冊函式,如下方所示:
# Define the admin class
class AuthorAdmin(admin.ModelAdmin):
    pass

# Register the admin class with the associated model
admin.site.register(Author, AuthorAdmin)
現在我們要為 Book 以及 BookInstance 模型添加 ModelAdmin 類別,我們一樣要先把原本的註冊程式碼註解:
#admin.site.register(Book)
#admin.site.register(BookInstance)
現在我們要創造並註冊新的模型;為了達到示範的目的,我們會使用 @register 裝飾器替代先前做法來註冊模型(這跟 admin.site.register() 的語法做的事情完全一樣):
# Register the Admin classes for Book using the decorator
@admin.register(Book)
class BookAdmin(admin.ModelAdmin):
    pass

# Register the Admin classes for BookInstance using the decorator
@admin.register(BookInstance)
class BookInstanceAdmin(admin.ModelAdmin):
    pass
目前為止我們的管理類別都是空的(可以看到 "pass"),所以我們的管理行為都不會改變!現在我們可以來進一步定義我們的「特定模型的管理行為」。
配置列表視圖(Configure list views)
我們的 LocalLibrary 目前條列出所有作者,而他們都是使用以模型的 __str__() 方法產生的物件名稱。如過你只有少數幾個作者,那倒還好,但如果作者很多,你最後可能會有非常多副本。因此為了區別他們,或者你只是想呈現更多作者的有趣訊息,你可以使用「列表展示」(list_display)來位視圖添加額外的字段。
將你的 AuthorAdmin 類別以下方程式碼取代。下方程式碼可以看出來,列表中被展示出來的字段名稱會被以需要的排序宣告為元組(tuple)形式。
class AuthorAdmin(admin.ModelAdmin):
    list_display = ('last_name', 'first_name', 'date_of_birth', 'date_of_death')
現在把網站導向作者列表,上方所設定的字段應該會被陳列出來,如下:
至於我們的 Book 模型,我們將額外添加 author 和 genre 兩樣。author 是一個ForeignKey 外鍵字段(一對一)關係,因此他將會透過關聯紀錄的 __str__() 值來表示。
將 BookAdmin 類別以下方區段程式碼取代:
class BookAdmin(admin.ModelAdmin):
    list_display = ('title', 'author', 'display_genre')
很不幸地,我們無法直接在 list_display 中指定「書籍類別」(genre field)字段,因為它是一個 ManyToManyField (多對多字段),因為如果這樣做會造成很大的資料庫讀寫「成本」,所以 Django 會預防這樣的狀況發生,因此,取而代之,我們將定義一個 display_genre 函式以「字串」形式得到書籍類別。(下方有定義此函式)
備註: Getting the genre may not be a good idea here, because of the "cost" of the database operation. We're showing you how because calling functions in your models can be very useful for other reasons — for example to add a Delete link next to every item in the list.
將以下程式碼添加到Book模型(models.py)。 這會從genre記錄的的頭三個值(如果有的話)創建一個字符串, 和創建一個在管理者網站中出現的short_description標題。
    def display_genre(self):
        """Create a string for the Genre. This is required to display genre in Admin."""
        return ', '.join(genre.name for genre in self.genre.all()[:3])

    display_genre.short_description = 'Genre'
保存模型並更新管理員後,打開你的網站並轉到「Books」列表頁面; 你應該會看到類似以下的書籍清單:
Genre 模型(如果定義了語言模型,則還有 Language 模型)都有一個欄位,因此沒有必要為它們創建其他模型以顯示欄位。
備註: 更新 BookInstance 模型列表用來顯示狀態和預期的返回日期是有價值的。 我們在本文結尾處添加了一個挑戰!
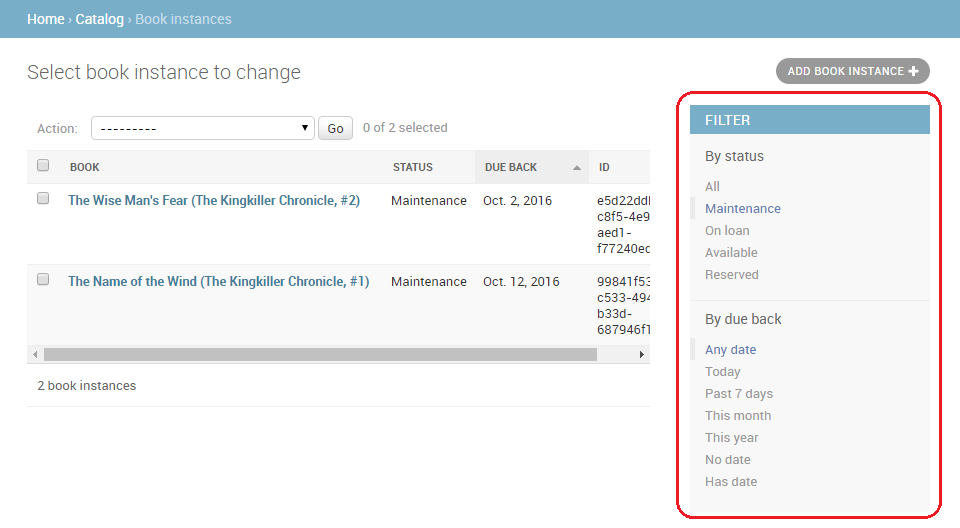
加入列表過濾器 (List Filter)
當你的列表有很多個記錄時, 加入列表過濾器可以幫助你過濾想顯示的記錄。加入list_filter這個屬性就可以。請用以下的程式碼來取代原本的 BookInstanceAdmin 類別
class BookInstanceAdmin(admin.ModelAdmin):
    list_filter = ('status', 'due_back')
現在的列表視圖右邊會多了一個過濾器。你可以選擇 dates 和 status 來做過濾:
組織詳細視圖佈局
默認情況下,局部視圖按照模型中聲明的順序垂直排列所有字段。 你可以更改聲明的順序,顯示(或排除)哪些字段,使用分段來組織資訊,水平顯示還是垂直顯示字段,甚至管理表單中使用哪些編輯小部件。
備註: LocalLibrary 模型相對簡單,因此我們無須更改佈局。 但我們仍然會進行一些更改,向你展示如何進行。
控制那些欄位顯示並佈置
更新你的 AuthorAdmin 類別用來新增 fields 這行,如同下列所示 (粗體):
class AuthorAdmin(admin.ModelAdmin):
    list_display = ('last_name', 'first_name', 'date_of_birth', 'date_of_death')
    fields = ['first_name', 'last_name', ('date_of_birth', 'date_of_death')]
fields 屬性僅按順序列出了要在表單上顯示的那些欄位。 默認情況下,字段是垂直顯示的,但是如果你進一步將它們分組到一個元組中,它們將水平顯示(如上面的「日期」字段中所示)。
在你的網站上,轉到作者詳細信息視圖-現在應如下所示:
備註: 你還可以使用 exclude 屬性來聲明要從表單中排除的屬性列表(將顯示模型中的所有其他屬性)。
Sectioning the detail view
You can add "sections" to group related model information within the detail form, using the fieldsets attribute.
In the BookInstance model we have information related to what the book is (i.e. name, imprint, and id) and when it will be available (status, due_back). We can add these in different sections by adding the text in bold to our BookInstanceAdmin class.
@admin.register(BookInstance)
class BookInstanceAdmin(admin.ModelAdmin):
    list_filter = ('status', 'due_back')

    fieldsets = (
        (None, {
            'fields': ('book', 'imprint', 'id')
        }),
        ('Availability', {
            'fields': ('status', 'due_back')
        }),
    )
Each section has its own title (or None, if you don't want a title) and an associated tuple of fields in a dictionary — the format is complicated to describe, but fairly easy to understand if you look at the code fragment immediately above.
Now navigate to a book instance view in your website; the form should appear as shown below:
Inline editing of associated records
Sometimes it can make sense to be able to add associated records at the same time. For example, it may make sense to have both the book information and information about the specific copies you've got on the same detail page.
You can do this by declaring inlines, of type TabularInline (horizonal layout) or StackedInline (vertical layout, just like the default model layout). You can add the BookInstance information inline to our Book detail by adding the lines below in bold near your BookAdmin:
class BooksInstanceInline(admin.TabularInline):
    model = BookInstance

@admin.register(Book)
class BookAdmin(admin.ModelAdmin):
    list_display = ('title', 'author', 'display_genre')
    inlines = [BooksInstanceInline]
Now navigate to a view for a Book in your website — at the bottom you should now see the book instances relating to this book (immediately below the book's genre fields):
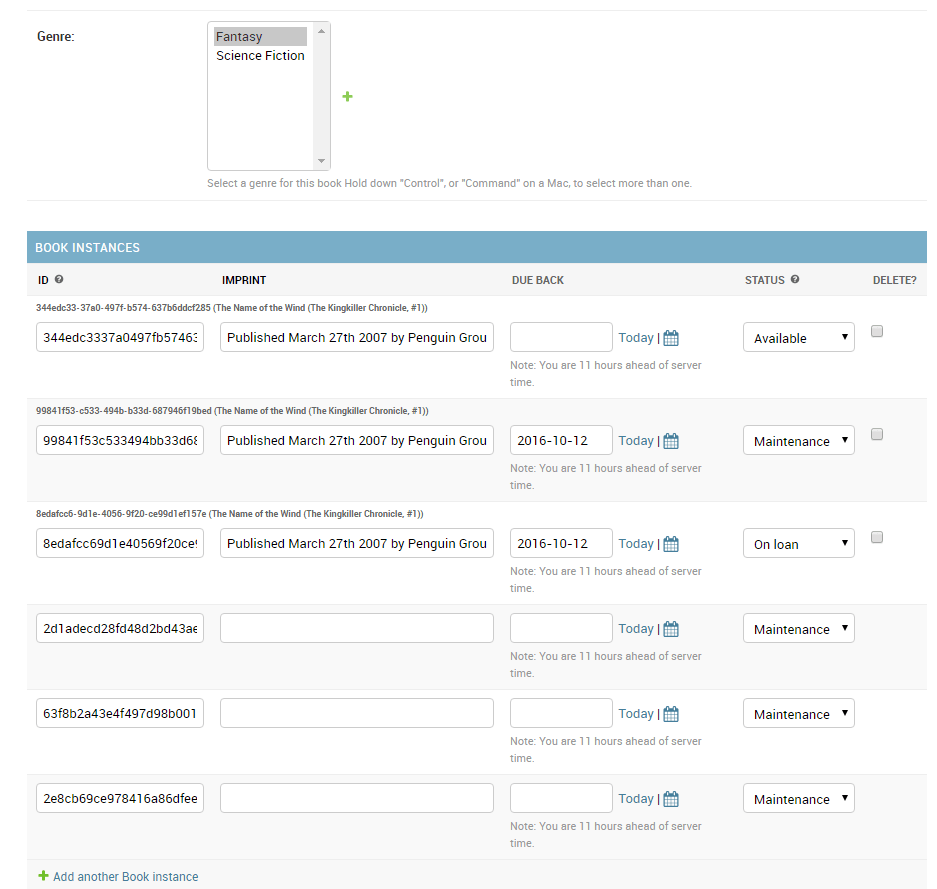
In this case all we've done is declare our tabular inline class, which just adds all fields from the inlined model. You can specify all sorts of additional information for the layout, including the fields to display, their order, whether they are read only or not, etc. (see TabularInline for more information).
備註: There are some painful limits in this functionality! In the screenshot above we have three existing book instances, followed by three placeholders for new book instances (which look very similar!). It would be better to have NO spare book instances by default and just add them with the Add another Book instance link, or to be able to just list the BookInstances as non-readable links from here. The first option can be done by setting the extra attribute to 0 in BooksInstanceInline model, try it by yourself.
自我挑戰
在本節中我們學到了很多東西,所以現在該你嘗試一些事情了。
- 對於
BookInstance列表視圖(list view),添加代碼以顯示books,status,due back date和id(而不是默認的__str__()文本)。 - 使用與
Book/BookInstance相同的方法將Book項目的內聯列表添加到Author的詳細視圖(detail view)中。
小結
就是這樣! 你現在已經了解瞭如何以最簡單和改進的形式設置管理者網站,如何創建超級用戶,以及如何瀏覽管理者網站,查看,刪除和更新記錄。 在此過程中,你已經創建了許多 Books,BookInstances,Genres 和 Authors,一旦我們創建了自己的 view 和 templates,便可以列出和顯示這些記錄。
延伸閱讀
- Writing your first Django app, part 2: Introducing the Django Admin (Django docs)
- The Django Admin site (Django Docs)