Django Tutorial Part 9: Working with forms
在本教程中,我們將向你展示,如何在 Django 中使用 HTML 表單,特別是編寫表單以創建,更新和刪除模型實例的最簡單方法。作為本演示的一部分,我們將擴展 LocalLibrary 網站,以便圖書館員,可以使用我們自己的表單(而不是使用管理員應用程序)更新圖書,創建,更新和刪除作者。
| 前提: | 完成先前所有的教程, 包含 Django Tutorial Part 8: User authentication and permissions (en-US). |
|---|---|
| 目的: | 了解如何製作表單來向用戶取得資訊並更新資料庫。了解通用類別表單編輯視圖 ( generic class-based form editing views ) 能夠大幅簡化用於單一模型的表單製作。 |
概述
HTML 表單是網頁上的一組一個或多個字段/小組件,可用於從用戶收集信息以提交到服務器。 表單是一種用於收集用戶輸入的靈活機制,因為有合適的小部件可以輸入許多不同類型的數據,包括文本框,複選框,單選按鈕,日期選擇器等。表單也是與服務器共享數據的相對安全的方式, 因為它們允許我們在具有跨站點請求偽造保護的POST 請求中發送數據。
儘管到目前為止,本教程中尚未創建任何表單,但我們已經在 Django Admin 網站中遇到過這些表單-例如,下面的屏幕截圖顯示了一種用於編輯我們的Book 模型的表單,該表單由許多選擇列表和 文字編輯器。

使用表單可能會很複雜!開發人員需要為表單編寫 HTML,在服務器上(也可能在瀏覽器中)驗證並正確清理輸入的數據,使用錯誤消息重新發布表單以通知用戶任何無效字段,並在成功提交數據後處理數據,最後以某種方式回應用戶以表示成功。 Django 表單通過提供一個框架使你能夠以編程方式定義表單及其字段,然後使用這些對像生成表單 HTML 代碼並處理許多驗證和用戶交互,從而完成了所有這些步驟中的大量工作。
在本教程中,我們將向你展示創建和使用表單的幾種方法,尤其是通用編輯表單視圖如何顯著減少創建表單來操縱表單所需的工作量。楷模。在此過程中,我們將擴展本地圖書館應用程序,方法是添加一個允許圖書館員續訂圖書的表格,並創建頁面以創建,編輯和刪除圖書和作者(複製上面顯示的表格的基本版本以編輯圖書) )。
HTML 表單
首先簡要介紹一下 HTML Forms。 考慮一個簡單的 HTML 表單,其中有一個用於輸入某些「團隊」名稱的文本字段及其相關標籤:
![]()
表單在 HTML 中定義為 <form>...</form> 標記內元素的集合,其中至少包含type="submit".的input元素。
<form action="/team_name_url/" method="post">
  <label for="team_name">Enter name: </label>
  <input
    id="team_name"
    type="text"
    name="name_field"
    value="Default name for team." />
  <input type="submit" value="OK" />
</form>
雖然這裡只有一個用於輸入團隊名稱的文本字段,但是表單可以具有任意數量的其他輸入元素及其關聯的標籤。字段的type 屬性定義將顯示哪種小部件。字段的 name 和id 用於標識 JavaScript / CSS / HTML 中的字段,而 value定義該字段在首次顯示時的初始值。匹配的團隊標籤是使用label 標籤指定的(請參見上面的「輸入名稱」),其中的 for 字段包含相關input的id 值。
submit 輸入將顯示為一個按鈕(默認情況下),用戶可以按下該按鈕以將表單中所有其他輸入元素中的數據上載到服務器(在這種情況下,僅是team_name)。表單屬性定義用於發送數據的 HTTPmethod 以及服務器上數據的目的地(action):
action: 提交表單時,將數據發送到該資源/ URL 進行處理。如果未設置(或設置為空字符串),則表單將被提交回當前頁面 URL。method: 用於發送數據的 HTTP 方法:post 或 get。- 如果數據將導致服務器數據庫的更改,則應始終使用
POST方法,因為這樣可以使它更能抵抗跨站點的偽造請求攻擊。 GET方法應僅用於不更改用戶數據的表單(例如搜索表單)。建議你在希望添加書籤或共享 URL 時使用。
- 如果數據將導致服務器數據庫的更改,則應始終使用
服務器的角色是首先呈現初始表單狀態-包含空白字段,或預填充初始值。用戶按下「提交」按鈕後,服務器將從 Web 瀏覽器接收帶有值的表單數據,並且必須驗證信息。如果表單包含無效數據,則服務器應再次顯示該表單,這一次將在「有效」字段中顯示用戶輸入的數據,並顯示描述無效字段問題的消息。服務器收到包含所有有效表單數據的請求後,便可以執行適當的操作(例如,保存數據,返回搜索結果,上傳文件等),然後通知用戶。
可以想像,創建 HTML,驗證返回的數據,在需要時使用錯誤報告重新顯示輸入的數據以及對有效數據執行所需的操作都需要花費大量精力才能「正確」。 Django 通過刪除一些繁瑣且重複的代碼,使此操作變得更加容易!
Django 表單處理流程
Django 的表單處理使用了我們在以前的教程中學到的所有相同技術(用於顯示有關模型的信息):視圖獲取請求,執行所需的任何操作,包括從模型中讀取數據,然後生成並返回 HTML 頁面( 從模板中,我們傳遞一個包含要顯示的數據的上下文)。 使事情變得更加複雜的是,服務器還需要能夠處理用戶提供的數據,並在出現任何錯誤時重新顯示頁面。
下面顯示了 Django 處理表單請求的過程流程圖,該流程圖從對包含表單的頁面的請求(以綠色顯示)開始。
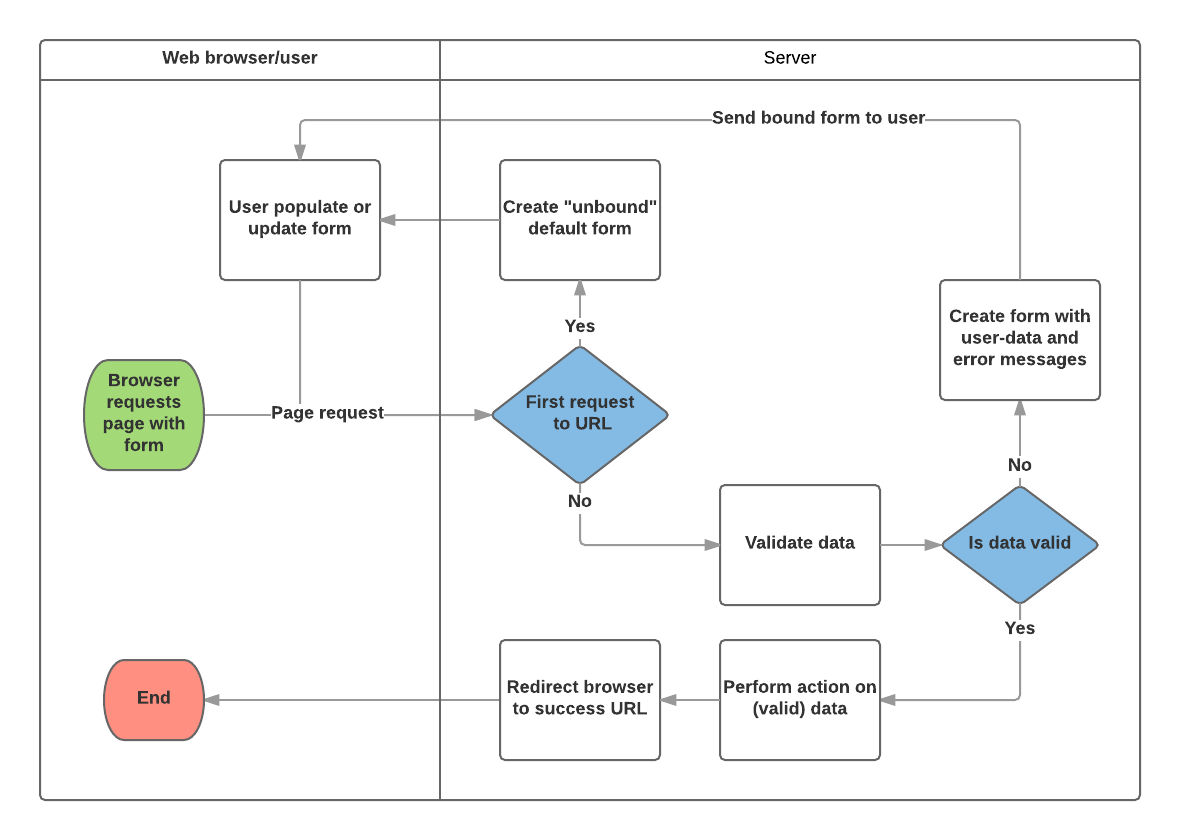
根據上圖,Django 表單處理的主要功能是:
- 在用戶第一次請求時顯示默認表單。
- 該表單可能包含空白字段(例如,如果你正在創建新記錄),或者可能會預先填充有初始值(例如,如果你正在更改記錄或具有有用的默認初始值)。
- 由於此表單與任何用戶輸入的數據均不相關(儘管它可能具有初始值),因此在這一點上被稱為未綁定。
- 從提交請求中接收數據並將其綁定到表單。
- 將數據綁定到表單意味著當我們需要重新顯示表單時,用戶輸入的數據和任何錯誤均可用。
- 清理並驗證數據。
- 清理數據會對輸入執行清理操作(例如,刪除可能用於向服務器發送惡意內容的無效字符),並將其轉換為一致的 Python 類型。
- 驗證會檢查該值是否適合該字段(例如,日期範圍正確,時間不要太短或太長等)
- 如果任何數據無效,則這次重新顯示該表單,其中包含用戶填充的所有值和問題字段的錯誤消息。
- 如果所有數據均有效,請執行所需的操作(例如,保存數據,發送和發送電子郵件,返回搜索結果,上傳文件等)
- 完成所有操作後,將用戶重定向到另一個頁面。
Django 提供了許多工具和方法來幫助你完成上述任務。 最基本的是 Form類,它簡化了表單 HTML 的生成和數據清除/驗證的過程。 在下一節中,我們將使用頁面的實際示例描述表單如何工作,以使圖書館員可以續訂書籍。
備註: 當我們討論 Django 的更多「高級」表單框架類時,了解Form的使用方式將對你有所幫助。
使用表單和功能視圖續訂表單
接下來,我們將添加一個頁面,以使圖書館員可以續借借來的書。 為此,我們將創建一個允許用戶輸入日期值的表單。 我們將從當前日期(正常藉閱期)起 3 週內為該字段提供初始值,並添加一些驗證以確保館員不能輸入過去的日期或將來的日期。 輸入有效日期後,我們會將其寫入當前記錄的BookInstance.due_back 字段中。
該示例將使用基於函數的視圖和Form 類。 以下各節說明表單的工作方式,以及你需要對正在進行的 LocalLibrary 項目進行的更改。
Form
Form類是 Django 表單處理系統的核心。 它指定表單中的字段,其佈局,顯示小部件,標籤,初始值,有效值,以及(一旦驗證)與無效字段關聯的錯誤消息。 該類還提供了使用預定義格式(表,列表等)在模板中呈現自身的方法,或用於獲取任何元素的值(啟用細粒度手動呈現)的方法。
申報表格
Form 的聲明語法與聲明Model的語法非常相似,並且具有相同的字段類型(和一些相似的參數)。 這是有道理的,因為在兩種情況下,我們都需要確保每個字段都處理正確的數據類型,被限制為有效數據並具有顯示/文檔描述。
要創建一個表單,我們導入Form 庫,從Form 類派生,並聲明表單的字段。 下面顯示了我們的圖書館圖書續訂表格的一個非常基本的表格類:
from django import forms

class RenewBookForm(forms.Form):
    renewal_date = forms.DateField(help_text="Enter a date between now and 4 weeks (default 3).")
Form fields
In this case we have a single DateField for entering the renewal date that will render in HTML with a blank value, the default label "Renewal date:", and some helpful usage text: "Enter a date between now and 4 weeks (default 3 weeks)." As none of the other optional arguments are specified the field will accept dates using the input_formats: YYYY-MM-DD (2016-11-06), MM/DD/YYYY (02/26/2016), MM/DD/YY (10/25/16), and will be rendered using the default widget: DateInput.
There are many other types of form fields, which you will largely recognise from their similarity to the equivalent model field classes: BooleanField, CharField, ChoiceField, TypedChoiceField, DateField, DateTimeField, DecimalField, DurationField, EmailField, FileField, FilePathField, FloatField, ImageField, IntegerField, GenericIPAddressField, MultipleChoiceField, TypedMultipleChoiceField, NullBooleanField, RegexField, SlugField, TimeField, URLField, UUIDField, ComboField, MultiValueField, SplitDateTimeField, ModelMultipleChoiceField, ModelChoiceField.
The arguments that are common to most fields are listed below (these have sensible default values):
- required: If
True, the field may not be left blank or given aNonevalue. Fields are required by default, so you would setrequired=Falseto allow blank values in the form. - label: The label to use when rendering the field in HTML. If label is not specified then Django would create one from the field name by capitalising the first letter and replacing underscores with spaces (e.g. Renewal date).
- label_suffix: By default a colon is displayed after the label (e.g. Renewal date**:**). This argument allows you to specify a different suffix containing other character(s).
- initial: The initial value for the field when the form is displayed.
- widget: The display widget to use.
- help_text (as seen in the example above): Additional text that can be displayed in forms to explain how to use the field.
- error_messages: A list of error messages for the field. You can override these with your own messages if needed.
- validators: A list of functions that will be called on the field when it is validated.
- localize: Enables the localisation of form data input (see link for more information).
- disabled: The field is displayed but its value cannot be edited if this is
True. The default isFalse.
Validation
Django provides numerous places where you can validate your data. The easiest way to validate a single field is to override the method clean_<fieldname>() for the field you want to check. So for example, we can validate that entered renewal_date values are between now and 4 weeks by implementing clean_renewal_date() as shown below.
from django import forms

from django.core.exceptions import ValidationError
from django.utils.translation import ugettext_lazy as _
import datetime #for checking renewal date range.

class RenewBookForm(forms.Form):
    renewal_date = forms.DateField(help_text="Enter a date between now and 4 weeks (default 3).")

    def clean_renewal_date(self):
        data = self.cleaned_data['renewal_date']

        #Check date is not in past.
        if data < datetime.date.today():
            raise ValidationError(_('Invalid date - renewal in past'))

        #Check date is in range librarian allowed to change (+4 weeks).
        if data > datetime.date.today() + datetime.timedelta(weeks=4):
            raise ValidationError(_('Invalid date - renewal more than 4 weeks ahead'))

        # Remember to always return the cleaned data.
        return data
There are two important things to note. The first is that we get our data using self.cleaned_data['renewal_date'] and that we return this data whether or not we change it at the end of the function. This step gets us the data "cleaned" and sanitised of potentially unsafe input using the default validators, and converted into the correct standard type for the data (in this case a Python datetime.datetime object).
The second point is that if a value falls outside our range we raise a ValidationError, specifying the error text that we want to display in the form if an invalid value is entered. The example above also wraps this text in one of Django's translation functions ugettext_lazy() (imported as _()), which is good practice if you want to translate your site later.
備註: There are numerious other methods and examples for validating forms in Form and field validation (Django docs). For example, in cases where you have multiple fields that depend on each other, you can override the Form.clean() function and again raise a ValidationError.
That's all we need for the form in this example!
Copy the Form
Create and open the file locallibrary/catalog/forms.py and copy the entire code listing from the previous block into it.
URL Configuration
Before we create our view, let's add a URL configuration for the renew-books page. Copy the following configuration to the bottom of locallibrary/catalog/urls.py.
urlpatterns += [
    path('book/<uuid:pk>/renew/', views.renew_book_librarian, name='renew-book-librarian'),
]
The URL configuration will redirect URLs with the format /catalog/book/<bookinstance id>/renew/ to the function named renew_book_librarian() in views.py, and send the BookInstance id as the parameter named pk. The pattern only matches if pk is a correctly formatted uuid.
備註: We can name our captured URL data "pk" anything we like, because we have complete control over the view function (we're not using a generic detail view class that expects parameters with a certain name). However pk, short for "primary key", is a reasonable convention to use!
View
As discussed in the Django form handling process above, the view has to render the default form when it is first called and then either re-render it with error messages if the data is invalid, or process the data and redirect to a new page if the data is valid. In order to perform these different actions, the view has to be able to know whether it is being called for the first time to render the default form, or a subsequent time to validate data.
For forms that use a POST request to submit information to the server, the most common pattern is for the view to test against the POST request type (if request.method == 'POST':) to identify form validation requests and GET (using an else condition) to identify the initial form creation request. If you want to submit your data using a GET request then a typical approach for identifying whether this is the first or subsequent view invocation is to read the form data (e.g. to read a hidden value in the form).
The book renewal process will be writing to our database, so by convention we use the POST request approach. The code fragment below shows the (very standard) pattern for this sort of function view.
from django.shortcuts import get_object_or_404
from django.http import HttpResponseRedirect
from django.urls import reverse
import datetime

from .forms import RenewBookForm

def renew_book_librarian(request, pk):
    book_inst=get_object_or_404(BookInstance, pk = pk)

    # If this is a POST request then process the Form data
    if request.method == 'POST':

        # Create a form instance and populate it with data from the request (binding):
        form = RenewBookForm(request.POST)

        # Check if the form is valid:
        if form.is_valid():
            # process the data in form.cleaned_data as required (here we just write it to the model due_back field)
            book_inst.due_back = form.cleaned_data['renewal_date']
            book_inst.save()

            # redirect to a new URL:
            return HttpResponseRedirect(reverse('all-borrowed') )

    # If this is a GET (or any other method) create the default form.
    else:
        proposed_renewal_date = datetime.date.today() + datetime.timedelta(weeks=3)
        form = RenewBookForm(initial={'renewal_date': proposed_renewal_date,})

    return render(request, 'catalog/book_renew_librarian.html', {'form': form, 'bookinst':book_inst})
First we import our form (RenewBookForm) and a number of other useful objects/methods used in the body of the view function:
get_object_or_404(): Returns a specified object from a model based on its primary key value, and raises anHttp404exception (not found) if the record does not exist.HttpResponseRedirect: This creates a redirect to a specified URL (HTTP status code 302).reverse(): This generates a URL from a URL configuration name and a set of arguments. It is the Python equivalent of theurltag that we've been using in our templates.datetime: A Python library for manipulating dates and times.
In the view we first use the pk argument in get_object_or_404() to get the current BookInstance (if this does not exist, the view will immediately exit and the page will display a "not found" error). If this is not a POST request (handled by the else clause) then we create the default form passing in an initial value for the renewal_date field (as shown in bold below, this is 3 weeks from the current date).
    book_inst=get_object_or_404(BookInstance, pk = pk)

    # If this is a GET (or any other method) create the default form
    else:
        proposed_renewal_date = datetime.date.today() + datetime.timedelta(weeks=3)
        form = RenewBookForm(initial={'renewal_date': proposed_renewal_date,})

    return render(request, 'catalog/book_renew_librarian.html', {'form': form, 'bookinst':book_inst})
After creating the form, we call render() to create the HTML page, specifying the template and a context that contains our form. In this case the context also contains our BookInstance, which we'll use in the template to provide information about the book we're renewing.
If however this is a POST request, then we create our form object and populate it with data from the request. This process is called "binding" and allows us to validate the form. We then check if the form is valid, which runs all the validation code on all of the fields — including both the generic code to check that our date field is actually a valid date and our specific form's clean_renewal_date() function to check the date is in the right range.
    book_inst=get_object_or_404(BookInstance, pk = pk)

    # If this is a POST request then process the Form data
    if request.method == 'POST':

        # Create a form instance and populate it with data from the request (binding):
        form = RenewBookForm(request.POST)

        # Check if the form is valid:
        if form.is_valid():
            # process the data in form.cleaned_data as required (here we just write it to the model due_back field)
            book_inst.due_back = form.cleaned_data['renewal_date']
            book_inst.save()

            # redirect to a new URL:
            return HttpResponseRedirect(reverse('all-borrowed') )

    return render(request, 'catalog/book_renew_librarian.html', {'form': form, 'bookinst':book_inst})
If the form is not valid we call render() again, but this time the form value passed in the context will include error messages.
If the form is valid, then we can start to use the data, accessing it through the form.cleaned_data attribute (e.g. data = form.cleaned_data['renewal_date']). Here we just save the data into the due_back value of the associated BookInstance object.
警告: While you can also access the form data directly through the request (for example request.POST['renewal_date'] or request.GET['renewal_date'] (if using a GET request) this is NOT recommended. The cleaned data is sanitised, validated, and converted into Python-friendly types.
The final step in the form-handling part of the view is to redirect to another page, usually a "success" page. In this case we use HttpResponseRedirect and reverse() to redirect to the view named 'all-borrowed' (this was created as the "challenge" in Django Tutorial Part 8: User authentication and permissions (en-US)). If you didn't create that page consider redirecting to the home page at URL '/').
That's everything needed for the form handling itself, but we still need to restrict access to the view to librarians. We should probably create a new permission in BookInstance ("can_renew"), but to keep things simple here we just use the @permission_required function decorator with our existing can_mark_returned permission.
The final view is therefore as shown below. Please copy this into the bottom of locallibrary/catalog/views.py.
from django.contrib.auth.decorators import permission_required

from django.shortcuts import get_object_or_404
from django.http import HttpResponseRedirect
from django.urls import reverse
import datetime

from .forms import RenewBookForm

@permission_required('catalog.can_mark_returned')
def renew_book_librarian(request, pk):
    """
    View function for renewing a specific BookInstance by librarian
    """
    book_inst=get_object_or_404(BookInstance, pk = pk)

    # If this is a POST request then process the Form data
    if request.method == 'POST':

        # Create a form instance and populate it with data from the request (binding):
        form = RenewBookForm(request.POST)

        # Check if the form is valid:
        if form.is_valid():
            # process the data in form.cleaned_data as required (here we just write it to the model due_back field)
            book_inst.due_back = form.cleaned_data['renewal_date']
            book_inst.save()

            # redirect to a new URL:
            return HttpResponseRedirect(reverse('all-borrowed') )

    # If this is a GET (or any other method) create the default form.
    else:
        proposed_renewal_date = datetime.date.today() + datetime.timedelta(weeks=3)
        form = RenewBookForm(initial={'renewal_date': proposed_renewal_date,})

    return render(request, 'catalog/book_renew_librarian.html', {'form': form, 'bookinst':book_inst})
The template
Create the template referenced in the view (/catalog/templates/catalog/book_renew_librarian.html) and copy the code below into it:
{% extends "base_generic.html" %}
{% block content %}

    <h1>Renew: {{bookinst.book.title}}</h1>
    <p>Borrower: {{bookinst.borrower}}</p>
    <p{% if bookinst.is_overdue %} class="text-danger"{% endif %}>Due date: {{bookinst.due_back}}</p>

    <form action="" method="post">
        {% csrf_token %}
        <table>
        {{ form }}
        </table>
        <input type="submit" value="Submit" />
    </form>

{% endblock %}
Most of this will be completely familiar from previous tutorials. We extend the base template and then redefine the content block. We are able to reference {{bookinst}} (and its variables) because it was passed into the context object in the render() function, and we use these to list the book title, borrower and the original due date.
The form code is relatively simple. First we declare the form tags, specifying where the form is to be submitted (action) and the method for submitting the data (in this case an "HTTP POST") — if you recall the HTML Forms overview at the top of the page, an empty action as shown, means that the form data will be posted back to the current URL of the page (which is what we want!). Inside the tags we define the submit input, which a user can press to submit the data. The {% csrf_token %} added just inside the form tags is part of Django's cross-site forgery protection.
備註: Add the {% csrf_token %} to every Django template you create that uses POST to submit data. This will reduce the chance of forms being hijacked by malicious users.
All that's left is the {{form}} template variable, which we passed to the template in the context dictionary. Perhaps unsurprisingly, when used as shown this provides the default rendering of all the form fields, including their labels, widgets, and help text — the rendering is as shown below:
<tr>
  <th><label for="id_renewal_date">Renewal date:</label></th>
  <td>
    <input
      id="id_renewal_date"
      name="renewal_date"
      type="text"
      value="2016-11-08"
      required />
    <br />
    <span class="helptext"
      >Enter date between now and 4 weeks (default 3 weeks).</span
    >
  </td>
</tr>
備註: It is perhaps not obvious because we only have one field, but by default every field is defined in its own table row (which is why the variable is inside table tags above). This same rendering is provided if you reference the template variable {{ form.as_table }}.
If you were to enter an invalid date, you'd additionally get a list of the errors rendered in the page (shown in bold below).
<tr>
  <th><label for="id_renewal_date">Renewal date:</label></th>
  <td>
    <ul class="errorlist">
      <li>Invalid date - renewal in past</li>
    </ul>
    <input
      id="id_renewal_date"
      name="renewal_date"
      type="text"
      value="2015-11-08"
      required />
    <br />
    <span class="helptext"
      >Enter date between now and 4 weeks (default 3 weeks).</span
    >
  </td>
</tr>
Other ways of using form template variable
Using {{form}} as shown above, each field is rendered as a table row. You can also render each field as a list item (using {{form.as_ul}} ) or as a paragraph (using {{form.as_p}}).
What is even more cool is that you can have complete control over the rendering of each part of the form, by indexing its properties using dot notation. So for example we can access a number of separate items for our renewal_date field:
{{form.renewal_date}}:The whole field.{{form.renewal_date.errors}}: The list of errors.{{form.renewal_date.id_for_label}}: The id of the label.{{form.renewal_date.help_text}}: The field help text.- etc!
For more examples of how to manually render forms in templates and dynamically loop over template fields, see Working with forms > Rendering fields manually (Django docs).
Testing the page
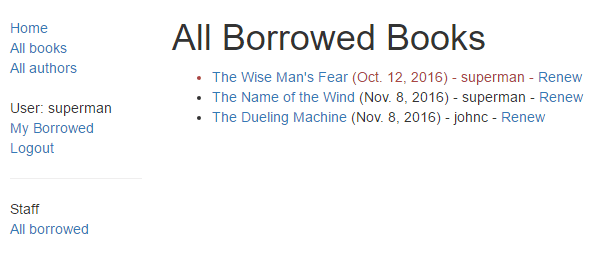
If you accepted the "challenge" in Django Tutorial Part 8: User authentication and permissions (en-US) you'll have a list of all books on loan in the library, which is only visible to library staff. We can add a link to our renew page next to each item using the template code below.
{% if perms.catalog.can_mark_returned %}- <a href="{% url 'renew-book-librarian' bookinst.id %}">Renew</a>{% endif %}
備註: Remember that your test login will need to have the permission "catalog.can_mark_returned" in order to access the renew book page (perhaps use your superuser account).
You can alternatively manually construct a test URL like this — http://127.0.0.1:8000/catalog/book/<bookinstance_id>/renew/ (a valid bookinstance id can be obtained by navigating to a book detail page in your library, and copying the id field).
What does it look like?
If you are successful, the default form will look like this:
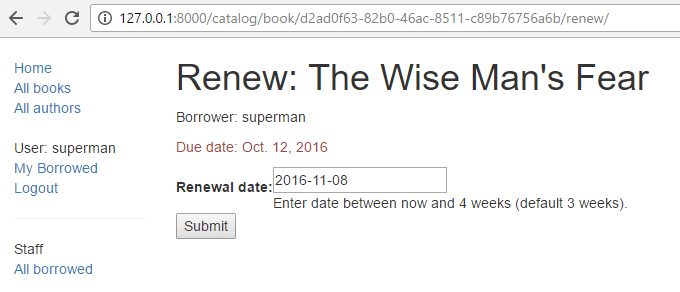
The form with an invalid value entered, will look like this:

The list of all books with renew links will look like this:
ModelForms
Creating a Form class using the approach described above is very flexible, allowing you to create whatever sort of form page you like and associate it with any model or models.
However if you just need a form to map the fields of a single model then your model will already define most of the information that you need in your form: fields, labels, help text, etc. Rather than recreating the model definitions in your form, it is easier to use the ModelForm helper class to create the form from your model. This ModelForm can then be used within your views in exactly the same way as an ordinary Form.
A basic ModelForm containing the same field as our original RenewBookForm is shown below. All you need to do to create the form is add class Meta with the associated model (BookInstance) and a list of the model fields to include in the form (you can include all fields using fields = '__all__', or you can use exclude (instead of fields) to specify the fields not to include from the model).
from django.forms import ModelForm
from .models import BookInstance

class RenewBookModelForm(ModelForm):
    class Meta:
        model = BookInstance
        fields = ['due_back',]
備註: This might not look like all that much simpler than just using a Form (and it isn't in this case, because we just have one field). However if you have a lot of fields, it can reduce the amount of code quite significantly!
The rest of the information comes from the model field definitions (e.g. labels, widgets, help text, error messages). If these aren't quite right, then we can override them in our class Meta, specifying a dictionary containing the field to change and its new value. For example, in this form we might want a label for our field of "Renewal date" (rather than the default based on the field name: Due date), and we also want our help text to be specific to this use case. The Meta below shows you how to override these fields, and you can similarly set widgets and error_messages if the defaults aren't sufficient.
class Meta:
    model = BookInstance
    fields = ['due_back',]
    labels = { 'due_back': _('Renewal date'), }
    help_texts = { 'due_back': _('Enter a date between now and 4 weeks (default 3).'), }
To add validation you can use the same approach as for a normal Form — you define a function named clean_field_name() and raise ValidationError exceptions for invalid values. The only difference with respect to our original form is that the model field is named due_back and not "renewal_date".
from django.forms import ModelForm
from .models import BookInstance

class RenewBookModelForm(ModelForm):
    def clean_due_back(self):
       data = self.cleaned_data['due_back']

       #Check date is not in past.
       if data < datetime.date.today():
           raise ValidationError(_('Invalid date - renewal in past'))

       #Check date is in range librarian allowed to change (+4 weeks)
       if data > datetime.date.today() + datetime.timedelta(weeks=4):
           raise ValidationError(_('Invalid date - renewal more than 4 weeks ahead'))

       # Remember to always return the cleaned data.
       return data

    class Meta:
        model = BookInstance
        fields = ['due_back',]
        labels = { 'due_back': _('Renewal date'), }
        help_texts = { 'due_back': _('Enter a date between now and 4 weeks (default 3).'), }
The class RenewBookModelForm below is now functionally equivalent to our original RenewBookForm. You could import and use it wherever you currently use RenewBookForm.
Generic editing views
The form handling algorithm we used in our function view example above represents an extremely common pattern in form editing views. Django abstracts much of this "boilerplate" for you, by creating generic editing views for creating, editing, and deleting views based on models. Not only do these handle the "view" behaviour, but they automatically create the form class (a ModelForm) for you from the model.
備註: In addition to the editing views described here, there is also a FormView class, which lies somewhere between our function view and the other generic views in terms of "flexibility" vs "coding effort". Using FormView you still need to create your Form, but you don't have to implement all of the standard form-handling pattern. Instead you just have to provide an implementation of the function that will be called once the submitted is known to be be valid.
In this section we're going to use generic editing views to create pages to add functionality to create, edit, and delete Author records from our library — effectively providing a basic reimplementation of parts of the Admin site (this could be useful if you need to offer admin functionality in a more flexible way that can be provided by the admin site).
Views
Open the views file (locallibrary/catalog/views.py) and append the following code block to the bottom of it:
from django.views.generic.edit import CreateView, UpdateView, DeleteView
from django.urls import reverse_lazy
from .models import Author

class AuthorCreate(CreateView):
    model = Author
    fields = '__all__'
    initial={'date_of_death':'05/01/2018',}

class AuthorUpdate(UpdateView):
    model = Author
    fields = ['first_name','last_name','date_of_birth','date_of_death']

class AuthorDelete(DeleteView):
    model = Author
    success_url = reverse_lazy('authors')
As you can see, to create the views you need to derive from CreateView, UpdateView, and DeleteView (respectively) and then define the associated model.
For the "create" and "update" cases you also need to specify the fields to display in the form (using in same syntax as for ModelForm). In this case we show both the syntax to display "all" fields, and how you can list them individually. You can also specify initial values for each of the fields using a dictionary of field_name/value pairs (here we arbitrarily set the date of death for demonstration purposes — you might want to remove that!). By default these views will redirect on success to a page displaying the newly created/edited model item, which in our case will be the author detail view we created in a previous tutorial. You can specify an alternative redirect location by explicitly declaring parameter success_url (as done for the AuthorDelete class).
The AuthorDelete class doesn't need to display any of the fields, so these don't need to be specified. You do however need to specify the success_url, because there is no obvious default value for Django to use. In this case we use the reverse_lazy() function to redirect to our author list after an author has been deleted — reverse_lazy() is a lazily executed version of reverse(), used here because we're providing a URL to a class-based view attribute.
Templates
The "create" and "update" views use the same template by default, which will be named after your model: model_name_form.html (you can change the suffix to something other than _form using the template_name_suffix field in your view, e.g. template_name_suffix = '_other_suffix')
Create the template file locallibrary/catalog/templates/catalog/author_form.html and copy in the text below.
{% extends "base_generic.html" %}

{% block content %}
<form action="" method="post">
  {% csrf_token %}
  <table>
    {{ form.as_table }}
  </table>
  <input type="submit" value="Submit" />
</form>
{% endblock %}
This is similar to our previous forms, and renders the fields using a table. Note also how again we declare the {% csrf_token %} to ensure that our forms are resistant to CSRF attacks.
The "delete" view expects to find a template named with the format model_name_confirm_delete.html (again, you can change the suffix using template_name_suffix in your view). Create the template file locallibrary/catalog/templates/catalog/author_confirm_delete.html and copy in the text below.
{% extends "base_generic.html" %}

{% block content %}

<h1>Delete Author</h1>

<p>Are you sure you want to delete the author: {{ author }}?</p>

<form action="" method="POST">
  {% csrf_token %}
  <input type="submit" value="Yes, delete." />
</form>

{% endblock %}
URL configurations
Open your URL configuration file (locallibrary/catalog/urls.py) and add the following configuration to the bottom of the file:
urlpatterns += [
    path('author/create/', views.AuthorCreate.as_view(), name='author_create'),
    path('author/<int:pk>/update/', views.AuthorUpdate.as_view(), name='author_update'),
    path('author/<int:pk>/delete/', views.AuthorDelete.as_view(), name='author_delete'),
]
There is nothing particularly new here! You can see that the views are classes, and must hence be called via .as_view(), and you should be able to recognise the URL patterns in each case. We must use pk as the name for our captured primary key value, as this is the parameter name expected by the view classes.
The author create, update, and delete pages are now ready to test (we won't bother hooking them into the site sidebar in this case, although you can do so if you wish).
備註: Observant users will have noticed that we didn't do anything to prevent unauthorised users from accessing the pages! We leave that as an exercise for you (hint: you could use the PermissionRequiredMixin and either create a new permission or reuse our can_mark_returned permission).
Testing the page
First login to the site with an account that has whatever permissions you decided are needed to access the author editing pages.
Then navigate to the author create page: http://127.0.0.1:8000/catalog/author/create/, which should look like the screenshot below.
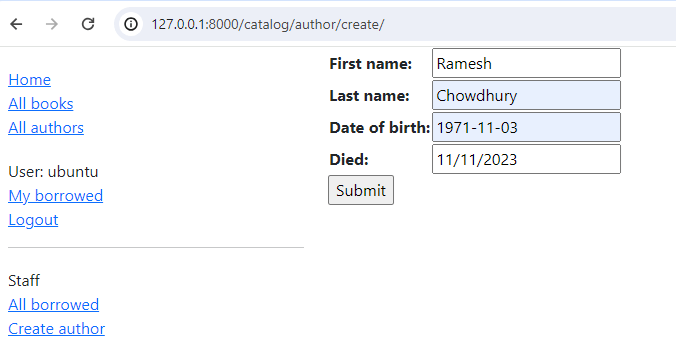
Enter values for the fields and then press Submit to save the author record. You should now be taken to a detail view for your new author, with a URL of something like http://127.0.0.1:8000/catalog/author/10.
You can test editing records by appending /update/ to the end of the detail view URL (e.g. http://127.0.0.1:8000/catalog/author/10/update/) — we don't show a screenshot, because it looks just like the "create" page!
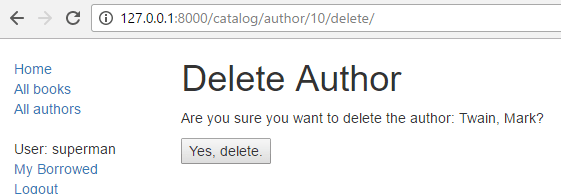
Last of all we can delete the page, by appending delete to the end of the author detail-view URL (e.g. http://127.0.0.1:8000/catalog/author/10/delete/). Django should display the delete page shown below. Press Yes, delete. to remove the record and be taken to the list of all authors.
Challenge yourself
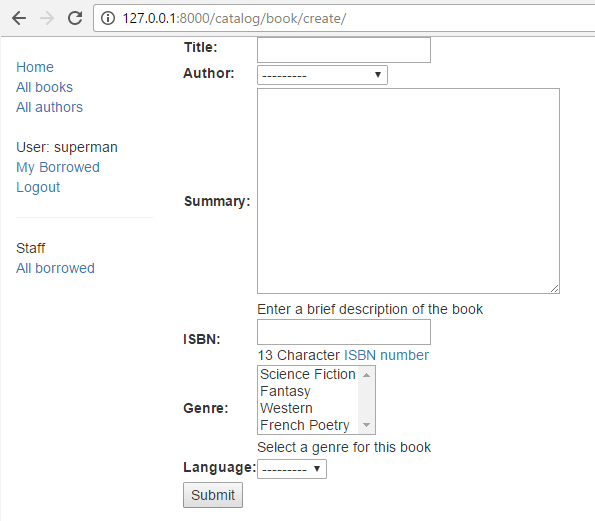
Create some forms to create, edit and delete Book records. You can use exactly the same structure as for Authors. If your book_form.html template is just a copy-renamed version of the author_form.html template, then the new "create book" page will look like the screenshot below:
Summary
Creating and handling forms can be a complicated process! Django makes it much easier by providing programmatic mechanisms to declare, render and validate forms. Furthermore, Django provides generic form editing views that can do almost all the work to define pages that can create, edit, and delete records associated with a single model instance.
There is a lot more that can be done with forms (check out our See also list below), but you should now understand how to add basic forms and form-handling code to your own websites.
See also
- Working with forms (Django docs)
- Writing your first Django app, part 4 > Writing a simple form (Django docs)
- The Forms API (Django docs)
- Form fields (Django docs)
- Form and field validation (Django docs)
- Form handling with class-based views (Django docs)
- Creating forms from models (Django docs)
- Generic editing views (Django docs)