Django Tutorial Part 6: Generic list and detail views
本教程擴充了 LocalLibrary 網站,為書本與作者增加列表與細節頁面。此處我們將學到通用類別視圖,並演示如何降低你必須為一般使用案例撰寫的程式碼數量。我們也會更加深入 URL 處理細節,演示如何實施基本模式匹配。
| 前提: | Complete all previous tutorial topics, including Django Tutorial Part 5: Creating our home page. |
|---|---|
| 目的: | To understand where and how to use generic class-based views, and how to extract patterns from URLs and pass the information to views. |
Overview
本教程中,通過為書本和作者添加列表和詳細信息頁面,我們將完成第一個版本的 LocalLibrary 網站(或者更準確地說,我們將向你展示如何實現書頁,並讓你自己創建作者頁面!) )
該過程在創建索引頁面,我們在上一個教程中展示了該頁面。我們仍然需要創建 URL 地圖,視圖和模板。主要區別在於,對於詳細信息頁面,我們還有一個額外的挑戰,即從 URL 對於這些頁面,我們將演示一種完全不同的視圖類型:基於類別的通用列表和詳細視圖。這些可以顯著減少所需的視圖代碼量,有助於更容易編寫和維護。
本教程的最後一部分,將演示在使用基於類別的通用列表視圖時,如何對數據進行分頁。
Book list page
該書將顯示每條記錄的標題和作者,標題是指向相關圖書詳細信息頁面的超鏈接。該頁面將具有與站點中,所有其他頁面相同的結構和導航,因此,我們可以擴展在上一個教程中創建的基本模板 (base_generic.html)。
URL mapping
開啟/catalog/urls.py,並複製加入下面粗體顯示的代碼。就像索引頁面的方式,這個 path()函數,定義了一個與 URL 匹配的模式('books /'),如果 URL 匹配,將調用視圖函數(views.BookListView.as_view())和一個對應的特定映射的名稱。
urlpatterns = [
    path('', views.index, name='index'),
    path('books/', views.BookListView.as_view(), name='books'),
]
正如前一個教程中所討論的,URL 必須已經先匹配了/ catalog,因此實際上將為 URL 調用的視圖是:/ catalog / books /。
我們將繼承現有的泛型視圖函數,該函數已經完成了我們希望此視圖函數執行的大部分工作,而不是從頭開始編寫自己的函數。對於基於 Django 類的視圖,我們通過調用類方法 as_view(),來訪問適當的視圖函數。由此可以創建類的實例,並確保為 HTTP 請求正確的處理程序方法。
View (class-based)
我們可以很容易地,將書本列表列表編寫為常規函數(就像我們之前的索引視圖一樣),進入查詢數據庫中的所有書本,然後調用 render(),將列表傳遞給指定的模板。然而,我們用另一種方 法取代,我們將使用基於類的通用列表視圖(ListView)-一個繼承自現有視圖的類。因為通用視圖,已經實現了我們需要的大部分功能,並且遵循 Django 最佳實踐,我們將能夠創建更強大的列表視圖,代碼更多,重複次數最多,最終維護所需。
開啟 catalog / views.py,將以下代碼複製到文件的底部:
from django.views import generic

class BookListView(generic.ListView):
    model = Book
就是這樣!通用 view 將查詢數據庫,以獲取指定模型(Book)的所有記錄,然後呈現/locallibrary/catalog/templates/catalog/book_list.html 的模板(我們將在下面創建)。在模板中,你可以使用所謂的 object_list 或 book_list 的模板變量(即通常為「 the_model_name_list」),以訪問書本列表。
備註: This awkward path for the template location isn't a misprint — the generic views look for templates in /application_name/the_model_name_list.html (catalog/book_list.html in this case) inside the application's /application_name/templates/ directory (/catalog/templates/).
你可以添加屬性,以更改上面的某種行為。例如,如果需要使用同一模型的多個視圖,則可以指定另一個模板文件,或者如果 book_list 對於特定模板用例不直觀,則可能需要使用不同的模板變量名稱。可能最有用的變更,是更改/過濾返回的結果子集-因此,你可能會列出其他用戶閱讀的前 5 本書,而不是列出所有書本。
class BookListView(generic.ListView):
    model = Book
    context_object_name = 'my_book_list'   # your own name for the list as a template variable
    queryset = Book.objects.filter(title__icontains='war')[:5] # Get 5 books containing the title war
    template_name = 'books/my_arbitrary_template_name_list.html'  # Specify your own template name/location
Overriding methods in class-based views
雖然我們不需要在這裡執行此操作,但你也可以覆寫某些類別方法。
例如,我們可以覆寫 get_queryset()方法,來更改返回的記錄列表。這比單獨設置 queryset 屬性更靈活,就像我們在前面的代碼片段中進行的那樣(儘管在這案例中沒有太大用處):
class BookListView(generic.ListView):
    model = Book

    def get_queryset(self):
        return Book.objects.filter(title__icontains='war')[:5] # Get 5 books containing the title war
我們還可以重寫get_context_data() 以便將其他上下文變數傳遞給模組 (例如,默認情況下傳遞書籍列表). 下面的片段顯示瞭如何向上下文添加名為"some_data" 的變數(然後它將用作模組變數)
class BookListView(generic.ListView):
    model = Book

    def get_context_data(self, **kwargs):
        # Call the base implementation first to get the context
        context = super(BookListView, self).get_context_data(**kwargs)
        # Create any data and add it to the context
        context['some_data'] = 'This is just some data'
        return context
執行此操作時,務必遵循上面使用的模式:
- 首先從我們的 superclass 中獲取現有內文。
- 然後添加新的內文信息。
- 然後返回新的(更新後)內文。
備註: Check out Built-in class-based generic views (Django docs) for many more examples of what you can do.
Creating the List View template
建立 HTML 及複製以下文字串到**/locallibrary/catalog/templates/catalog/book_list.html** , 這是基於通用類的列表視圖所期望的默認模板文件 (默認在catalog中名稱為Book 的模組).
通用的 views 模板跟其他的模板沒有不同 (儘管傳遞給模板的內文/訊息當然可以不同). 與 index 模板一樣,我們在第一行中擴展了基本模板,然後更替名為 content的區塊。
{% extends "base_generic.html" %}

{% block content %}
  <h1>Book List</h1>
  {% if book_list %}
    <ul>
      {% for book in book_list %}
      <li>
        <a href="{{ book.get_absolute_url }}">{{ book.title }}</a>
        ({{book.author}})
      </li>
      {% endfor %}
    </ul>
  {% else %}
    <p>There are no books in the library.</p>
  {% endif %}
{% endblock %}
該視圖默認將上下文(書籍列表)作為object_list 和 book_list 別名傳遞;兩者都會起作用.
Conditional execution
我們使用 if, else 和 endif 模組標籤,以檢查book_list 是否已定義並且不為空。 如果 book_list 為空值, 則 else 子句回傳 text 說明沒有書可以列出. 如果book_list不是空值, 然後我們遍曆書籍清單。
{% if book_list %}
  <!-- code here to list the books -->
{% else %}
  <p>There are no books in the library.</p>
{% endif %}
The condition above only checks for one case, but you can test on additional conditions using the elif template tag (e.g. {% elif var2 %} ). For more information about conditional operators see: if, ifequal/ifnotequal, and ifchanged in Built-in template tags and filters (Django Docs).
For loops
The template uses the for and endfor template tags to loop through the book list, as shown below. Each iteration populates the book template variable with information for the current list item.
{% for book in book_list %}
  <li><!-- code here get information from each book item --></li>
{% endfor %}
While not used here, within the loop Django will also create other variables that you can use to track the iteration. For example, you can test the forloop.last variable to perform conditional processing the last time that the loop is run.
Accessing variables
The code inside the loop creates a list item for each book that shows both the title (as a link to the yet-to-be-created detail view) and the author.
<a href="{{ book.get_absolute_url }}">{{ book.title }}</a> ({{book.author}})
We access the fields of the associated book record using the "dot notation" (e.g. book.title and book.author), where the text following the book item is the field name (as defined in the model).
We can also call functions in the model from within our template — in this case we call Book.get_absolute_url() to get an URL you could use to display the associated detail record. This works provided the function does not have any arguments (there is no way to pass arguments!)
備註: We have to be a little careful of "side effects" when calling functions in templates. Here we just get a URL to display, but a function can do pretty much anything — we wouldn't want to delete our database (for example) just by rendering our template!
Update the base template
Open the base template (/locallibrary/catalog/templates/base_generic.html) and insert {% url 'books' %} into the URL link for All books, as shown below. This will enable the link in all pages (we can successfully put this in place now that we've created the "books" url mapper).
<li><a href="{% url 'index' %}">Home</a></li>
<li><a href="{% url 'books' %}">All books</a></li>
<li><a href="">All authors</a></li>
What does it look like?
You won't be able to build book list yet, because we're still missing a dependency — the URL map for the book detail pages, which is needed to create hyperlinks to individual books. We'll show both list and detail views after the next section.
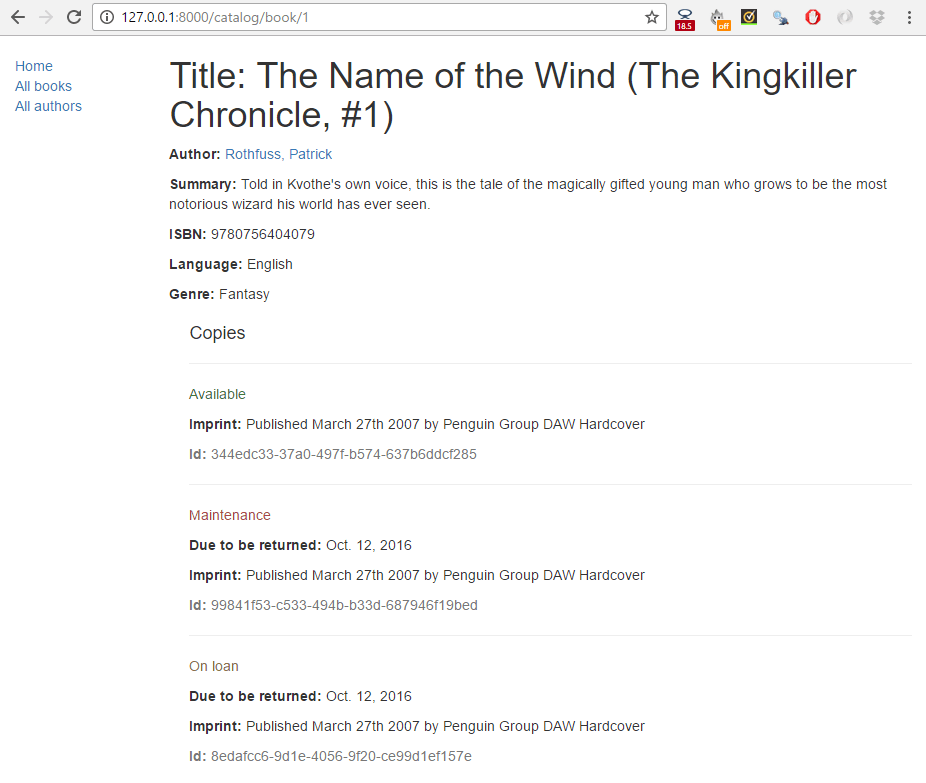
Book detail page
The book detail page will display information about a specific book, accessed using the URL catalog/book/<id> (where <id> is the primary key for the book). In addition to fields in the Book model (author, summary, ISBN, language, and genre), we'll also list the details of the available copies (BookInstances) including the status, expected return date, imprint, and id. This will allow our readers not just to learn about the book, but also to confirm whether/when it is available.
URL mapping
Open /catalog/urls.py and add the 'book-detail' URL mapper shown in bold below. This path() function defines a pattern, associated generic class-based detail view, and a name.
urlpatterns = [
    path('', views.index, name='index'),
    path('books/', views.BookListView.as_view(), name='books'),
    path('book/<int:pk>', views.BookDetailView.as_view(), name='book-detail'),
]
For the book-detail path the URL pattern uses a special syntax to capture the specific id of the book that we want to see. The syntax is very simple: angle brackets define the part of the URL to be captured, enclosing the name of the variable that the view can use to access the captured data. For example, <something> , will capture the marked pattern and pass the value to the view as a variable "something". You can optionally precede the variable name with a converter specification that defines the type of data (int, str, slug, uuid, path).
In this case we use '<int:pk>' to capture the book id, which must be an integer, and pass it to the view as a parameter named pk (short for primary key).
備註: As discussed previously, our matched URL is actually catalog/book/<digits> (because we are in the catalog application, /catalog/ is assumed).
警告: The generic class-based detail view expects to be passed a parameter named pk. If you're writing your own function view you can use whatever parameter name you like, or indeed pass the information in an unnamed argument.
Advanced path matching/regular expression primer
備註: You won't need this section to complete the tutorial! We provide it because knowing this option is likely to be useful in your Django-centric future.
The pattern matching provided by path() is simple and useful for the (very common) cases where you just want to capture any string or integer. If you need more refined filtering (for example, to filter only strings that have a certain number of characters) then you can use the re_path() method.
This method is used just like path() except that it allows you to specify a pattern using a Regular expression. For example, the previous path could have been written as shown below:
re_path(r'^book/(?P<pk>\d+)$', views.BookDetailView.as_view(), name='book-detail'),
Regular expressions are an incredibly powerful pattern mapping tool. They are, frankly, quite unintuitive and scary for beginners. Below is a very short primer!
The first thing to know is that regular expressions should usually be declared using the raw string literal syntax (i.e. they are enclosed as shown: r'<your regular expression text goes here>').
The main parts of the syntax you will need to know for declaring the pattern matches are:
| Symbol | Meaning |
|---|---|
| ^ | Match the beginning of the text |
| $ | Match the end of the text |
| \d | Match a digit (0, 1, 2, ... 9) |
| \w | Match a word character, e.g. any upper- or lower-case character in the alphabet, digit or the underscore character (_) |
| + | Match one or more of the preceding character. For example, to match one or more digits you would use \d+. To match one or more "a" characters, you could use a+ |
| * | Match zero or more of the preceding character. For example, to match nothing or a word you could use \w* |
| ( ) | Capture the part of the pattern inside the brackets. Any captured values will be passed to the view as unnamed parameters (if multiple patterns are captured, the associated parameters will be supplied in the order that the captures were declared). |
| (?P<name>...) | Capture the pattern (indicated by ...) as a named variable (in this case "name"). The captured values are passed to the view with the name specified. Your view must therefore declare an argument with the same name! |
| [ ] | Match against one character in the set. For example, [abc] will match on 'a' or 'b' or 'c'. [-\w] will match on the '-' character or any word character. |
Most other characters can be taken literally!
Lets consider a few real examples of patterns:
| Pattern | Description |
|---|---|
| r'^book/(?P<pk>\d+)$' |
This is the RE used in our url mapper. It matches a string that has
It also captures all the digits (?P<pk>\d+) and passes them to the view in a parameter named 'pk'. The captured values are always passed as a string!
For example, this would match |
| r'^book/(\d+)$' | This matches the same URLs as the preceding case. The captured information would be sent as an unnamed argument to the view. |
| r'^book/(?P<stub>[-\w]+)$' |
This matches a string that has
This is a fairly typical pattern for a "stub". Stubs are URL-friendly
word-based primary keys for data. You might use a stub if you wanted
your book URL to be more informative. For example
|
You can capture multiple patterns in the one match, and hence encode lots of different information in a URL.
備註: As a challenge, consider how you might encode an url to list all books released in a particular year, month, day, and the RE that could be used to match it.
Passing additional options in your URL maps
One feature that we haven't used here, but which you may find valuable, is that you can declare and pass additional options to the view. The options are declared as a dictionary that you pass as the third un-named argument to the path() function. This approach can be useful if you want to use the same view for multiple resources, and pass data to configure its behaviour in each case (below we supply a different template in each case).
path('url/', views.my_reused_view, {'my_template_name': 'some_path'}, name='aurl'),
path('anotherurl/', views.my_reused_view, {'my_template_name': 'another_path'}, name='anotherurl'),
備註: Both extra options and named captured patterns are passed to the view as named arguments. If you use the same name for both a captured pattern and an extra option then only the captured pattern value will be sent to the view (the value specified in the additional option will be dropped).
View (class-based)
Open catalog/views.py, and copy the following code into the bottom of the file:
class BookDetailView(generic.DetailView):
    model = Book
That's it! All you need to do now is create a template called /locallibrary/catalog/templates/catalog/book_detail.html, and the view will pass it the database information for the specific Book record extracted by the URL mapper. Within the template you can access the list of books with the template variable named object OR book (i.e. generically "the_model_name").
If you need to, you can change the template used and the name of the context object used to reference the book in the template. You can also override methods to, for example, add additional information to the context.
What happens if the record doesn't exist?
If a requested record does not exist then the generic class-based detail view will raise an Http404 exception for you automatically — in production this will automatically display an appropriate "resource not found" page, which you can customise if desired.
Just to give you some idea of how this works, the code fragment below demonstrates how you would implement the class-based view as a function, if you were not using the generic class-based detail view.
def book_detail_view(request, primary_key):
    try:
        book = Book.objects.get(pk=primary_key)
    except Book.DoesNotExist:
        raise Http404('Book does not exist')

    # from django.shortcuts import get_object_or_404
    # book = get_object_or_404(Book, pk=primary_key)

    return render(request, 'catalog/book_detail.html', context={'book': book})
The view first tries to get the specific book record from the model. If this fails the view should raise an Http404 exception to indicate that the book is "not found". The final step is then, as usual, to call render() with the template name and the book data in the context parameter (as a dictionary).
備註: The get_object_or_404() (shown commented out above) is a convenient shortcut to raise an Http404 exception if the record is not found.
Creating the Detail View template
Create the HTML file /locallibrary/catalog/templates/catalog/book_detail.html and give it the below content. As discussed above, this is the default template file name expected by the generic class-based detail view (for a model named Book in an application named catalog).
{% extends "base_generic.html" %}

{% block content %}
  <h1>Title: {{ book.title }}</h1>

  <p><strong>Author:</strong> <a href="">{{ book.author }}</a></p>
  <!-- author detail link not yet defined -->
  <p><strong>Summary:</strong> {{ book.summary }}</p>
  <p><strong>ISBN:</strong> {{ book.isbn }}</p>
  <p><strong>Language:</strong> {{ book.language }}</p>
  <p><strong>Genre:</strong> {{ book.genre.all|join:", " }}</p>

  <div style="margin-left:20px;margin-top:20px">
    <h4>Copies</h4>

    {% for copy in book.bookinstance_set.all %}
      <hr />
      <p
        class="{% if copy.status == 'a' %}text-success{% elif copy.status == 'm' %}text-danger{% else %}text-warning{% endif %}">
        {{ copy.get_status_display }}
      </p>
      {% if copy.status != 'a' %}
        <p><strong>Due to be returned:</strong> {{ copy.due_back }}</p>
      {% endif %}
      <p><strong>Imprint:</strong> {{ copy.imprint }}</p>
      <p class="text-muted"><strong>Id:</strong> {{ copy.id }}</p>
    {% endfor %}
  </div>
{% endblock %}
備註: The author link in the template above has an empty URL because we've not yet created an author detail page. Once that exists, you should update the URL like this:
<a href="{% url 'author-detail' book.author.pk %}">{{ book.author }}</a>
Though a little larger, almost everything in this template has been described previously:
- We extend our base template and override the "content" block.
- We use conditional processing to determine whether or not to display specific content.
- We use
forloops to loop through lists of objects. - We access the context fields using the dot notation (because we've used the detail generic view, the context is named
book; we could also use "object")
The one interesting thing we haven't seen before is the function book.bookinstance_set.all(). This method is "automagically" constructed by Django in order to return the set of BookInstance records associated with a particular Book.
{% for copy in book.bookinstance_set.all %}
<!-- code to iterate across each copy/instance of a book -->
{% endfor %}
需要這方法是因為我們僅在「一」那側 model(Book)定義一個ForeignKey (一對多)字段的關聯,也因為沒有任何的關聯被定義在「多」那側 model(BookInstance),故無法透過字段來取得相關的紀錄。為了克服這個問題,Django 建立一個 function 取名為「reverse lookup」供使用。function 的名字以一對多關係中該 ForeignKey 被定義在的那個模型名稱小寫,再在字尾加上_set(因此在 Book 創建的 function 名是 bookinstance_set())。
備註: 在這我們使用 all() 取得所有紀錄 (預設),你無法直接在 template 做是因為你無法指定引數到 function,但你可用 filter() 方法取得一個紀錄的子集 。
順帶一提,若你不再基於類的 view 或 model 定義順序(order),開發伺服器會將會報錯類似的訊息:
[29/May/2017 18:37:53] "GET /catalog/books/?page=1 HTTP/1.1" 200 1637
/foo/local_library/venv/lib/python3.5/site-packages/django/views/generic/list.py:99: UnorderedObjectListWarning: Pagination may yield inconsistent results with an unordered object_list: <QuerySet [<Author: Ortiz, David>, <Author: H. McRaven, William>, <Author: Leigh, Melinda>]>
  allow_empty_first_page=allow_empty_first_page, **kwargs)
That happens because the paginator object expects to see some ORDER BY being executed on your underlying database. Without it, it can't be sure the records being returned are actually in the right order!
This tutorial didn't reach Pagination (yet, but soon enough), but since you can't use sort_by() and pass a parameter (the same with filter() described above) you will have to choose between three choices:
- Add a
orderinginside aclass Metadeclaration on your model. - Add a
querysetattribute in your custom class-based view, specifying aorder_by(). - Adding a
get_querysetmethod to your custom class-based view and also specify theorder_by().
If you decide to go with a class Meta for the Author model (probably not as flexible as customizing the class-based view, but easy enough), you will end up with something like this:
class Author(models.Model):
    first_name = models.CharField(max_length=100)
    last_name = models.CharField(max_length=100)
    date_of_birth = models.DateField(null=True, blank=True)
    date_of_death = models.DateField('Died', null=True, blank=True)

    def get_absolute_url(self):
        return reverse('author-detail', args=[str(self.id)])

    def __str__(self):
        return f'{self.last_name}, {self.first_name}'

    class Meta:
        ordering = ['last_name']
Of course, the field doesn't need to be last_name: it could be any other.
And last, but not least, you should sort by an attribute/column that actually has a index (unique or not) on your database to avoid performance issues. Of course, this will not be necessary here (and we are probably getting ourselves too much ahead) if such small amount of books (and users!), but it is something to keep in mind for future projects.
What does it look like?
At this point we should have created everything needed to display both the book list and book detail pages. Run the server (python3 manage.py runserver) and open your browser to http://127.0.0.1:8000/.
警告: Don't click any author or author detail links yet — you'll create those in the challenge!
Click the All books link to display the list of books.
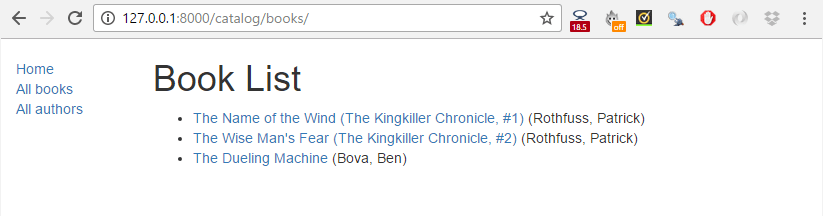
Then click a link to one of your books. If everything is set up correctly, you should see something like the following screenshot.
Pagination
If you've just got a few records, our book list page will look fine. However, as you get into the tens or hundreds of records the page will take progressively longer to load (and have far too much content to browse sensibly). The solution to this problem is to add pagination to your list views, reducing the number of items displayed on each page.
Django has excellent in-built support for pagination. Even better, this is built into the generic class-based list views so you don't have to do very much to enable it!
Views
Open catalog/views.py, and add the paginate_by line shown in bold below.
class BookListView(generic.ListView):
    model = Book
    paginate_by = 10
With this addition, as soon as you have more than 10 records the view will start paginating the data it sends to the template. The different pages are accessed using GET parameters — to access page 2 you would use the URL: /catalog/books/?page=2.
Templates
Now that the data is paginated, we need to add support to the template to scroll through the results set. Because we might want to do this in all list views, we'll do this in a way that can be added to the base template.
Open /locallibrary/catalog/templates/base_generic.html and copy in the following pagination block below our content block (highlighted below in bold). The code first checks if pagination is enabled on the current page. If so then it adds next and previous links as appropriate (and the current page number).
{% block content %}{% endblock %}

{% block pagination %}
  {% if is_paginated %}
    <div class="pagination">
      <span class="page-links">
        {% if page_obj.has_previous %}
          <a href="{{ request.path }}?page={{ page_obj.previous_page_number }}">previous</a>
        {% endif %}
        <span class="page-current">
          <p>Page {{ page_obj.number }} of {{ page_obj.paginator.num_pages }}.</p>
        </span>
        {% if page_obj.has_next %}
          <a href="{{ request.path }}?page={{ page_obj.next_page_number }}">next</a>
        {% endif %}
      </span>
    </div>
  {% endif %}
{% endblock %}
The page_obj is a Paginator object that will exist if pagination is being used on the current page. It allows you to get all the information about the current page, previous pages, how many pages there are, etc.
We use {{ request.path }} to get the current page URL for creating the pagination links. This is useful, because it is independent of the object that we're paginating.
Thats it!
What does it look like?
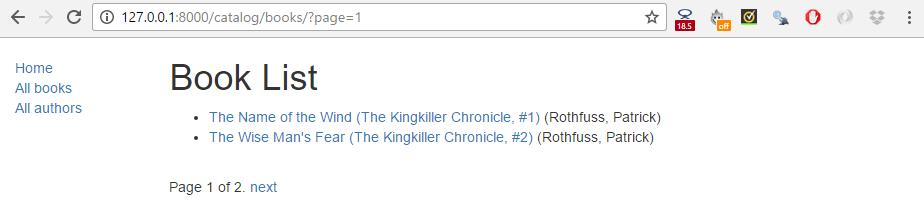
The screenshot below shows what the pagination looks like — if you haven't entered more than 10 titles into your database, then you can test it more easily by lowering the number specified in the paginate_by line in your catalog/views.py file. To get the below result we changed it to paginate_by = 2.
The pagination links are displayed on the bottom, with next/previous links being displayed depending on which page you're on.
Challenge yourself
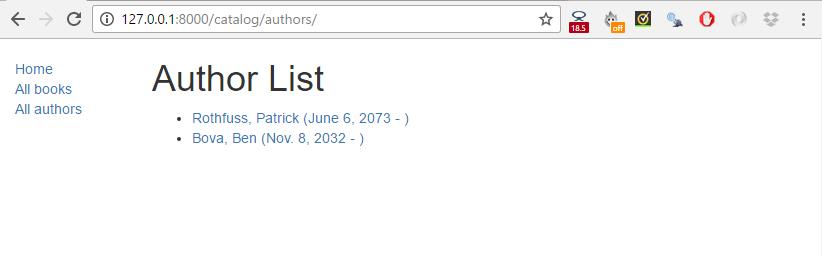
The challenge in this article is to create the author detail and list views required to complete the project. These should be made available at the following URLs:
catalog/authors/— The list of all authors.catalog/author/<id>— The detail view for the specific author with a primary key field named<id>
The code required for the URL mappers and the views should be virtually identical to the Book list and detail views we created above. The templates will be different, but will share similar behaviour.
備註:
- Once you've created the URL mapper for the author list page you will also need to update the All authors link in the base template. Follow the same process as we did when we updated the All books link.
- Once you've created the URL mapper for the author detail page, you should also update the book detail view template (/locallibrary/catalog/templates/catalog/book_detail.html) so that the author link points to your new author detail page (rather than being an empty URL). The line will change to add the template tag shown in bold below.
django
<p>
  <strong>Author:</strong>
  <a href="{% url 'author-detail' book.author.pk %}">{{ book.author }}</a>
</p>
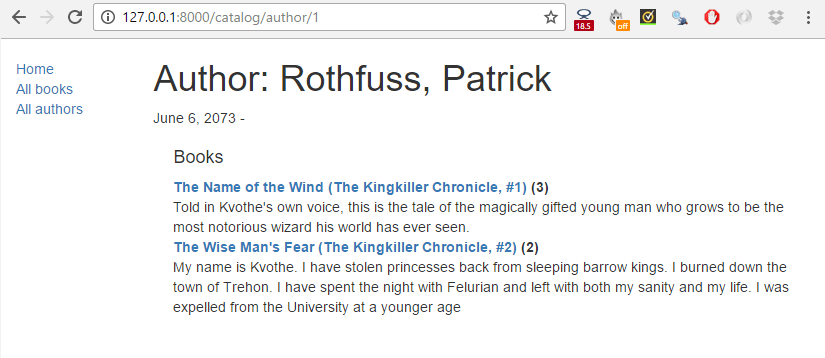
When you are finished, your pages should look something like the screenshots below.
Summary
Congratulations, our basic library functionality is now complete!
In this article we've learned how to use the generic class-based list and detail views and used them to create pages to view our books and authors. Along the way we've learned about pattern matching with regular expressions, and how you can pass data from URLs to your views. We've also learned a few more tricks for using templates. Last of all we've shown how to paginate list views, so that our lists are managable even when we have many records.
In our next articles we'll extend this library to support user accounts, and thereby demonstrate user authentication, permissons, sessions, and forms.
See also
- Built-in class-based generic views (Django docs)
- Generic display views (Django docs)
- Introduction to class-based views (Django docs)
- Built-in template tags and filters (Django docs).
- Pagination (Django docs)